Showing posts with label How to. Show all posts

Tuesday, July 8, 2014

How To Delete All Your Tweets

Almost all of us use Twitter, for sharing our life experiences and thoughts. But what if you want to start afresh and delete all the Tweets you have shared in the past? 
Doing this manually will be very difficult and time-consuming. But with free services like TweetDelete, it becomes just a matter of seconds.


Now you need to authorise the TweetDelete application which will enable the app to delete the tweets on your behalf.

Once authorised, the website will ask you the time, all the tweets posted before which will be deleted permanently.

Once chosen, click the “Activate TweetDelete” button, and your tweets before the time you select will be deleted.

The process can not be undone, make sure you have a copy of your tweets in case you want to go through them after deletion.

Saturday, April 12, 2014

How To Remove Duplicate File From System

Do you know how many files exists on your system in more than one location? We usually download a file and then forget. If we need it again, we again download it. And finding duplicate files is very difficult task. There are many tools available which helps in finding and removing duplicate files of your system. But NoClone helps you do this with 100% accuracy, and leaves very less effort on your part. You can also remove duplicate files with CCleaner

Remove Duplicate Files With NoClone


When given a folder (You can add multiple folders too) to NoClone, it scans all the files within that folder and the sub folders. It then compares all the files against one another and gives you the files that are exactly similar to each other. It lists the duplicate files along with their name, location, size and the modified date. You can mark the files that you want to remove and leave out the rest. After selecting all the files, you need to click the “Save Space” button in the top navigation.

Find And Remove Duplicate Files With NoClone


Though the free version has some limitations, for an average PC user the free version will suffice. One more thing that can irritate you is the countless prompts to buy the applications. But the application is very powerful and the features it provide can really make it very easy to manage your media collection. And don’t forget the free space you will get after you remove duplicate files.


Download NowClone

Monday, March 24, 2014

How To Get Feedburner Subscribers Count For Any Feed

Most of the big website show their feedburner subscribers to get more people to subscribe to their feed. They already have a good number of subscribers and more and more people easily subscribe to them. But most smaller bloggers tend to hide their subscriber count until they reach a decent number. And yes, it makes sense.
But what if you are too curious to know someone’s subscribers count without them showing it?
Below is a small tool that will let you know the subscriber count of any Feedburner feed. Just input the Feedburner ID and click the “Check Feedburner Feed” button. The subscriber count will be shown in the form of a chicklet below the button.

Below is the URL from where the above result is fetched. Just change the “feedID” with the Feedburner ID of the feed you want to see the subscribers of.

http://feeds.feedburner.com/~fc/feedID


If you have your feed on Feedburner and you can see your subscriber count, then that’s great and congrats, your feed is working icon biggrin . But if you don’t want to reveal your subscriber count for any reason, then we have a fix for you.

You need to login to your Feedburner account, then go to the “Publicize” tab. Now select “FeedCount” from the left pane and “Deactivate” the service.

If your feed is not showing and resulting in an error, then you can activate the service to see your subscriber count.

Thanks for reading ! Keep Sharing and Visiting !!

Tuesday, March 4, 2014

How To End Country Redirection In Google

Today I Am here with a new post making You know How To Stop Country Redirection In Google.
Many times we see, Oh Sorry I mean every time we see that whenever you type Google.Com,  It redirects automatically to like Google.Com.Pk (For Pakistan) and so on according to your country.
So Let’s Start in step by step !

STEP 1:- Open Your Browser, Here I Have Opened Google Chrome


STEP 2:- Now Here Is The Main Part Of The Post, While Typing Google.Com Or Any Country Based Domain Just Add Ncr Which Means No Country Redirection.
Now The URL Will Be www.Google.com/ncr


You can see in above Image that I have typed Google.Com/Ncr instead of just www.Google.Com and the result I got is in the below image.
As My Location Is In India Then Also It Has Redirection Me To www.Google.com


That’s It… Now You Have Learned How To Stop Country Redirection In Google

Comments, share !!!

How To Play Android Games On Your PC

Android phones and tablets today have become very common. Android’s strengths as well as the main reason to get it for her many exciting games and applications are available. There are hell lot of Android games and apps available for free, many are addicted to play Android games these days. But the sad thing is many awesome games are available only for the Android.

Using Blue Stacks

Android mobile phone or tablet, you certainly will play many fun games. New additions to Android with many exciting applications are also available. Put effects on pictures, especially if the applications are very famous. All the fun of Android applications and games on your PC can get. Blue Stacks software to help you any Android application or game you can play on your PC.

Requirements
To use this software requires that your system have at least two GB RAM.


Advantages:
You can play android games on Pc
you can test many android apps and games before you install in your mobile
you can sync apps from mobile to Pc
you can play your favourite games on big screen by playing on pc

Using Youwave to instal Android games on PC

Youwave also works fine to play Android games on your PC, but this is not available for free, Youwave is a paid emulator. Even in Youwave itself you can download the apps from the different play stores and play Android games on your PC.

Sunday, February 23, 2014

How to Optimize Windows 7/8 With Portable Managers

Windows 7/8 Managers Windows management software for Windows to manage Kabrany who want a few simple clicks is good . Using the software you can manage all system drivers separately and also managed to keep more than 30 instruments . 
Information Dskap all hardware information on the page is displayed . Windows Optimizer software , which improves performance Pshybany quickly turn on and off Windows. Using scanner software engine examines all the files . 
Software to delete files and folders on the disk space occupied by the devastating effects they have and it destroys . Rebuild the Windows Registry and speed up boot by the application software is possible . Replacement Windows Automatic background , custom menus , updated toolbar and customization software .
Security in Windows is one of the issues that users have to pay special attention to ensure they are safe from viruses and hackers . Encryption on folders and drivers are set by the Security Department . 
The final part of this software or the Network is a network in which all traces of Windows and Internet browsers have tested and optimized to speed . The software is suitable for Windows 32 and 64 bit versions are.


Features


  • - View detailed information for hardwar
  • - Optimize Windows
  • - Speed ​​up Windows boot
  • - Find Duplicate Files
  • - Windows Registry
  • - Defrag Windows
  • - Customize the toolbar
  • - Customize Menus
  • - Encryption on Windows
  • - Internet Speed ​​Optimizer
  • - Suitable for Windows 7/8
  • - Supports 32 and 64 bit versions


Thursday, February 20, 2014

Top 6 Method To Download YouTube Videos Without Any Software

Hello guys in this I will show you how to download YouTube video without any software this trick is very simple by using this trick you can download video.Downloading YouTube videos is not much difficult as it may seem. Just changing the YouTube video’s URL could do the trick, or if you like plugins/extensions, then clicking a link will let you download them too. We also got our hands on an application that can download YouTube videos and you can also queue multiple videos. Use the way you feel comfortable with, we have plenty of them.


Method 1, 2, 3

Copy YouTube Video Link
http://www.youtube.com/watch?v=cg-t4Wsa6LU

Now add “save” , “ss” or “kick” before youtube and press enter.

After adding of “ss” , “kick” or “save” , the link become like this..

Method 1: http://www.ssyoutube.com/watch?v=cg-t4Wsa6LU

Method 2: http://www.saveyoutube.com/watch?v=cg-t4Wsa6LU

Method 3: http://www.kickyoutube.com/watch?v=cg-t4Wsa6LU

After doing this then you will redirect to the new page where you can download this video in any format as your choice.


Method 4

KeepVid is a very popular website for downloading online videos. The website supports dozens of video sharing websites including YouTube, Dailymotion, Metacafe, Facebook and many others. The website lets you download any YouTube video in many different formats with many different video qualities. You can also download audio from any video online using KeepVid.


Method 5

Download YouTube videos without installing any extension/plugin/software in your browser/system. The single step includes the addition of “pwn” before “youtube” in any YouTube video URL.

Original URL: http://www.youtube.com/watch?v=DSNVS2boGPM

Changed URL: http://www.pwnyoutube.com/watch?v=DSNVS2boGPM


Method 6

If you are on a webpage which has one or more YouTube videos on it, like my own tutorial of using WhatsApp on PC, then you can download the videos from the page by adding “sfrom.net/” in front of the URL.
Original URL with YouTube video: http://www.youtube.com/watch?v=DSNVS2boGPM

Changed URL: sfrom.net/http://http://www.youtube.com/watch?v=DSNVS2boGPM


Enjoy :)

Thursday, February 6, 2014

How To Enable Developer Mode In Chrome

Chrome is the most popular browser in the world and is used by both the developers and the end-users. But all the developers and their extensions don’t make it through the Google’s eligibility process to be placed in the Chrome Web Store. As a result, they distribute their extensions through their own website and other means, other than the Chrome Web Store.
But Google Chrome does not allows its users to install extensions from unknown sources. So as a solution, you can enable the developer mode in Chrome.


Open Google Chrome, type “chrome://extensions” in the address bar and hit Enter.

Now you will see a checkbox with the label “developer mode“. Check the checkbox and now you can easily install any extension that’s not coming from the Chrome Web Store.

Enable Developer Mode Chrome


Download the “.crx” file of any extension you want to install. Then open the extensions page by typing “chrome://extensions” in the address bar and then press the “Enter” key. Now drag and drop your downloaded extensions on the “extensions” page to install them.

Sunday, February 2, 2014

Hide The Hard Drives In Windows Using CMD

In our computer sometimes we want to hide our personal folder or data from others like guest, friends .But if you can hide a drive that time no one can understand that you have another drive where you share your personal folder or data. And it’s look like a magic for others. I think you already know about this but those who don’t know about this you can do this simply. What if you could hide a complete drive and nobody could see or find it anywhere?


Here I am going to share another interesting use of Command Line. You can use the Command Prompt to hide one or more drives in the explorer. You can use a free tool to do the same but if you want you can easily hide a drive in a few seconds without using a third-party software.

 Follow These Steps:

1: Open Command Prompt as Administrator.First Press Start+R, one dialogue box will come write here CMD.

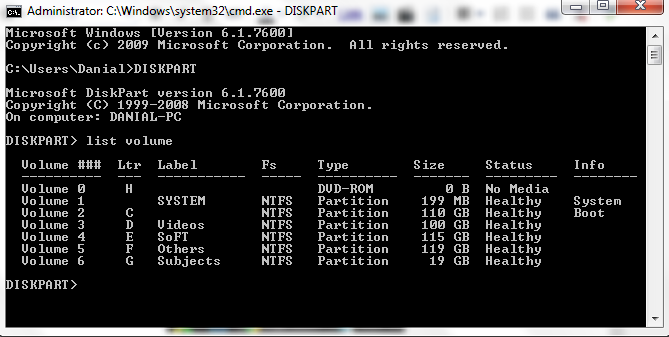
2.Command prompt will start and write here DISKPART [It is not mandatory to use capital or small letter] Then press Enter

3.Disk part will work as DISKPART> write here list volume and press Enter.

4:After pressing Enter you can see a list of your disk drive and choice, which drive you want to hide.


5: Now choose the volume you want to hide. Then type “select volume F” and hit Enter.Then you can see volume 5 [your number will be here] is selected.


6: Then write remove letter F [your drive]
A confirmation message will come like : Disk part successfully remove the drive letter or mount point And go to My computer and see. Your drive is disappear.


See your drives..

Done !!

How To Get Back The Hidden Drive Using CMD

Don't afraid about this you can back it again simply following this way..
1: Follow step 1-4 again.


2: Now instead of typing “remove letter F”, you need to type “assign letter F” and hit the Enter key. Change F with the letter you want to assign to this drive. For security and integrity, type the same letter which was assigned to this drive earlier.


DOne :)

See Your Drives...


I think you are clear about this post and I provide the screen shot of this. I think it will more helpful for you.

Note: That’s it. You will start to see the drive in Windows Explorer as soon as you do this. If it’s not there, try restarting your PC.

Thursday, January 30, 2014

How To Get 2500 Free Backlinks

Backlinks enable you to keep track of other pages on the web that link to your posts. For instance, suppose Alice writes a blog entry that Bob finds interesting. Bob then goes to his own blog and writes a post of his own about it, linking back to Alice's original post.
If you own a website then you would know how important backlinks are. So we have a nice tool that gives you 2500 backlinks absolutely free. The tool at-most gives 3124 backlinks but some of them fail to work and you are expected to get around 2500 Google crawl-able backlinks from the tool. The tool is provided by IMTalk.org and is called IMT Website Submitter.


What Type Of Backlinks You Will Receive :
The links generated by this tool are not normal backlinks. 
The tool will create pages on some popular whois or server information websites.
Google visits these sites very often, but the quality of backlinks may not be that good because these are not high Page Rank websites but you will get a decent number of backlinks to boost your site rankings.

Follow These Steps
1: You need to go to IMT Website Submiter


2: Scroll down and you will see a form asking your website URL for which you want backlinks. You can also provide keywords for your website and number of backlinks you need. I recommend selecting the highest number available.

3. After filling up your information just click the “Submit” button and you will start receiving backlinks for your site. The process will take time, so be patient and let your site rankings increase.
If you face any problems, feel free to drop your comments.


DOne !!!

Saturday, January 18, 2014

How To Rip The Videos Online

There are many you can rip and download YouTube videos. But what about the other video sharing services like Dailymotion, Yahoo Videos, Google Videos and others. A neat and free web service called Video Ripper allows you to rip online videos from many web services for free. Not only videos, you can also convert any video file to audio and then download only the audio file.


About Video Ripper

Video Ripper is the top and totally FREE service for you to rip online videos. It will facilitate you to rip videos from websites like YouTube, PBS, Fox, Videobash, Ted.com, and Liveleak. The process of free video ripping is extremely easy. All you need to do is copy and paste the video URL address into the "Rip" area, then click the "Rip" button. You can convert any video file to MP4, AVI, MOV, WMV, WEBM, MKV, MPG, 3GP, FLV or MP3, WAV, WMA, AAC, OGG. Don't miss this safe and easy FREE online Video Ripper!

Steps:

  • Copy the URL of the web page where the video lives.
  • Go to Video Ripper and paste the URL in the input box.
  • Click the Rip button. The browser may ask permissions to run the Java applet, allow it.
  • Rip online videos video ripper img.
  • Once the applet finishes its job, you will get the options to download the video in many formats and in many different qualities. You can download only the audio from the video too. The file sizes are also listed along with the files.
Keep Sharing and Visiting Here 


Friday, January 17, 2014

How To Play YouTube Video In VLC

In this trick I will tell you about How to play a YouTube video in VLC Player. 
VLC media player is one of the most trusted and reliable video player which supports almost any video format and seamlessly plays almost all kinds of videos and music. But, did you know that VLC can also be used for streaming, recording and watching YouTube videos. There are some advantages of playing the video in Vlc player.


  • Loop through any YouTube video to watch it again and again. This can be done by pressing the loop button in VLC.
  • It will save the bandwidth
  • You can stream and watch videos directly inside VLC without the need of the web browser. 
  • Capture any scene you want to. Make use of VLC’s snapshot feature which is located at “Video Take Snapshot“
  • All the image filters: the brightness, contrast, colour selection and others still work while watching YouTube videos in VLC.
  • You don’t need any flash player (most browsers need flash player) in order to play the video.
  • Alter the playback speed as you normally do with any other video.
  • Equalizers still work in VLC. If you are a music lover then listening to any song with your own set of audio output settings is a feature required for sure.
  • Moreover, you can use all the VLC controls which you would normally use while playing an offline video such as controlling the play speed, taking screenshots and applying video effects. 
  • The biggest benefit of using VLC is the ads free interface.


How To Play YouTube Videos In VLC

VLC can only play single YouTube videos by default. You have to install an extension to play YouTube playlists with VLC.

1. Playing a single video file in VLC

Copy the URL of the YouTube video and open VLC player.

Now go to “File > Open Network Stream“, you can also press the “CTRL + N” keyboard shortcut.

Paste the URL in the box and click the play button.

2. Playing YouTube Playlists in VLC

Make sure that VLC is up to date.

Download YouTube Playlist Parser, you can download it from the direct link.
Copy the downloaded file and paste it in:

For Windows: “%ProgramFiles% > VideoLAN > VLC > lua > playlist”
For Linux: “usr > lib > vlc > lua > playlist“
For Mac OS X: “Applications > VLC.app > Contents > MacOS > share > lua > playlist > “
Restart the VLC player.

Now try the same process as we did with the single YouTube video, but this time with a YouTube’s public playlist URL. With this tutorial you will be able to play any YouTube video and any YouTube playlist in VLC.

Enjoy And Keep Giving Your Feedback ! 

Tuesday, January 14, 2014

How to Recover Deleted Files Without Any Software

Sometimes we might have delete some important files accidentally and we need them back.
I'll show you a trick to recover your deleted files without using any 3rd party software. I'm not talking about restoring files from recycle bin. Just a simple trick that mostly people not know about this, and they started to recover the file via any other third party software and use other long tricks.


This simple trick mostly works on Vista versions and all the Windows 7 versions

For example lets assume that you have permanently deleted "My Sweet Heart.JPG" from the folder named "My LIFE" :P , and now you want to recover "My Sweet Heart.JPG" back.
Do this simple trick to recover your Sweet Heart.JPG
  • Right Click on the Particular folder
  • Select "Restore previous versions"

That's all, now you will see a option to recover the particular file.


If you don't see "Restore previous Versions" by Right Clicking,
 Then Go to:
  • Control Panel -->
  • System and Secutiry -->
  • System -->
  • Click on System Protection (in left sidebar) -->
  • Select the particular drive and Click Configure -->
  • Then select "Restore system setting and previous versions of files" -->
  • Now Click on OK
Previous versions come from restore points or from windows backup. This trick will not work properly in every OS.:( 

Thursday, November 7, 2013

How To Send Dp In Facebook Chat

Facebook is emerging worldwide and its chat features is amazing. It allows many emotions and expressions and allow you to add any kind of others emotions by third party extentions or plugins that increase your chat expreience. Emotions are being used in wordlwide for show your feelings in characters.
You can send your profile pictue (DP) in chat..
Just Follow These Simple Steps:

1: Login to your Facebook Id.
2: Go to profile which profile pic you want to send like smiles emotions.
3: Now copy the Url of that profile you want to send and save it in notepad.
4: Now copy the user name that is after "/" like "Danial.Javaid.Ansari" like in snapshot.


5: Make the double squar brackets on both the sides of user name like" [[Danial.Javaid.Ansari]] ".
6: Hit Enter and see the magic.

I hope you like my this simple trick ;) Please keep give me your feedback frequently...

Saturday, November 2, 2013

How To Hide/Remove Date Of Birth From Skype Profile

In this trick I will tell you a very simple trick to hide your DOB in skype profile easily.


Follow these simple steps one by one:

1: Login to Skype.
2: Go to Skype menu >> Profile >> Edit Your Profile.

3: Click on Show full Profile.

4: Edit Day, Date and Year as blank.
Changing will be saved automatically.

That's all.
Keep sharing my tricks if you like it. stay blessed !

Tuesday, October 29, 2013

How To Upgrade Windows 8 To Windows 8.1

Windows 8.1 Has New Exciting Features. This is known as the Blue Version 8.1 and latest release. Windows 8.1 is bugs free and new start feature than Windows 8.
If You Have Windows 8 OS Installed, Its Quite Simple To Upgrade To Windows 8.1


Just Follow These Steps :

1: Go To Windows Update Center And Check For Updates.


2: Download And Install All The Updates Shown In Important As Well As Optional Tab.


3: Now Open Store. Store Is In Start Menu of Windows.


4: In Store Find "Update To Windows 8.1 For Free" Click On That Option.


5: Now Click On Download.


6: Click On Continue If It Prompts For App Re-Installation.


7: After This It Will Prompt For Restart. Click On Restart.


Done !!!!

Now your Window 8 changes into 8.1 without any installation of Windows. Enjoy this latest trick and comment below frequently if you are facing any problem in this post.


Saturday, October 26, 2013

How To Download Files From DataFileHost

Data File Host Is a Host Website that is being used for files uploading and downloading.


You can upload any type of files up to 100 MB and download it unlimited times. If you are facing any problem to download any files through DataFileHost. Then You can follow these simple step via snapshots.

Steps to download files

1: First go to link which have download able files.

2: Uncheck the box If you want to download it through your own downloader.


3: Then click on "Download" up on the box.


Done!