Showing posts with label Window tricks. Show all posts

Saturday, April 12, 2014

How To Remove Duplicate File From System

Do you know how many files exists on your system in more than one location? We usually download a file and then forget. If we need it again, we again download it. And finding duplicate files is very difficult task. There are many tools available which helps in finding and removing duplicate files of your system. But NoClone helps you do this with 100% accuracy, and leaves very less effort on your part. You can also remove duplicate files with CCleaner

Remove Duplicate Files With NoClone


When given a folder (You can add multiple folders too) to NoClone, it scans all the files within that folder and the sub folders. It then compares all the files against one another and gives you the files that are exactly similar to each other. It lists the duplicate files along with their name, location, size and the modified date. You can mark the files that you want to remove and leave out the rest. After selecting all the files, you need to click the “Save Space” button in the top navigation.

Find And Remove Duplicate Files With NoClone


Though the free version has some limitations, for an average PC user the free version will suffice. One more thing that can irritate you is the countless prompts to buy the applications. But the application is very powerful and the features it provide can really make it very easy to manage your media collection. And don’t forget the free space you will get after you remove duplicate files.


Download NowClone

Sunday, February 2, 2014

Hide The Hard Drives In Windows Using CMD

In our computer sometimes we want to hide our personal folder or data from others like guest, friends .But if you can hide a drive that time no one can understand that you have another drive where you share your personal folder or data. And it’s look like a magic for others. I think you already know about this but those who don’t know about this you can do this simply. What if you could hide a complete drive and nobody could see or find it anywhere?


Here I am going to share another interesting use of Command Line. You can use the Command Prompt to hide one or more drives in the explorer. You can use a free tool to do the same but if you want you can easily hide a drive in a few seconds without using a third-party software.

 Follow These Steps:

1: Open Command Prompt as Administrator.First Press Start+R, one dialogue box will come write here CMD.

2.Command prompt will start and write here DISKPART [It is not mandatory to use capital or small letter] Then press Enter

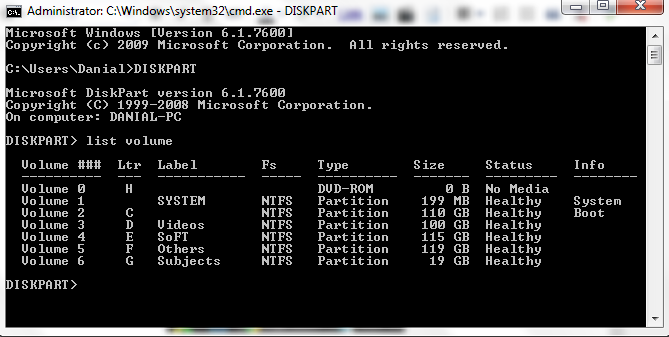
3.Disk part will work as DISKPART> write here list volume and press Enter.

4:After pressing Enter you can see a list of your disk drive and choice, which drive you want to hide.


5: Now choose the volume you want to hide. Then type “select volume F” and hit Enter.Then you can see volume 5 [your number will be here] is selected.


6: Then write remove letter F [your drive]
A confirmation message will come like : Disk part successfully remove the drive letter or mount point And go to My computer and see. Your drive is disappear.


See your drives..

Done !!

How To Get Back The Hidden Drive Using CMD

Don't afraid about this you can back it again simply following this way..
1: Follow step 1-4 again.


2: Now instead of typing “remove letter F”, you need to type “assign letter F” and hit the Enter key. Change F with the letter you want to assign to this drive. For security and integrity, type the same letter which was assigned to this drive earlier.


DOne :)

See Your Drives...


I think you are clear about this post and I provide the screen shot of this. I think it will more helpful for you.

Note: That’s it. You will start to see the drive in Windows Explorer as soon as you do this. If it’s not there, try restarting your PC.

Saturday, October 26, 2013

Windows Update Cleanup Recovers Many Gigabytes of Your Hard Disk Space

The new release of windows 8.1 has in built features that allows you to delete the all windows update files. This is easy process and can be accessable by window update cleanup in windows 8.1.
But there is problem in windows 7, you can manully delete the files in windows 7.This is not a easy task.


Now a days Microsoft comes with an update for windows 7 SP1 devices which adds this option. The update KB 2852386 is availabe from windows Update or you can download it from Microsoft.

After the installation the Program
Go to your Windows installation drive, right-click on it and choose “Properties”.
Then choose the “Disk Cleanup” option and there you will find a new item named “Windows Update Cleanup”.

In my case there were 1.66 GBs of Windows Update files, that were taking up unnecessary space.
To delete these files, you need to check this item and press the “OK” button.

Thats it
Now you have a lot of space of your hard disk via this simple trick. "Windows Update Cleanup Recovers Many Gigabytes of Your Hard Disk Space"

Note:
IF there is a problem to uninstall some of the updates , these file are currently installed on your pc.
However, this is not required in some cases and you can use this feature safely in your pcs. But remember if you installed any kind of updates dont do this because there may be some updates you would like to unistall.

Comment below frequently if you are facing any problem in this post otherwise give the feedback if you like my post.

Saturday, October 5, 2013

Revealing Windows Hidden “Send To” Menu & Adding Items In It

Hello Friends! In this article i will tell about a simple and usefull trick about "Revealing windows hidden "send to" menu and adding any item in it" !


Windows has a great “Send to” menu, that allows copying of files and folders directly to certain locations. The standard locations are not the only locations available, instead, it can be completely customized by adding your own preferred locations, and that too quite easily.


Original Send to menu

But first let me tell you about a hidden “sent to” menu. Just try to right-click on any file/folder by pressing and holding the “shift” key. Now navigate to the “Send to” menu and you will discover a lot of new locations available, which you would have never seen here before. If you are using the “Send to” menu for the first time, then try to open it without the “Shift” key pressed. You will get the difference.


Hidden Send to Menu


Adding Folders to Send to Menu

If the hidden send to menu does not contain your preferred locations, then don’t worry, we have you covered too. Just type “shell:sendto” into the File Explorer’s address bar and hit the “Enter” key. You will see a location containing all the items that are present in your “Send to” menu. In this folder you can paste shortcuts to any location, and all of them will show up in the “Send to” menu.


That’s it. Once you are done with the copy process, try the menu again. You will find your desired locations in the “send to” menu.

So how is my post? Comment below if you are facing any problem !


Find Windows Installation Date With Command Prompt

Hi guys! In this simple trick i will tell how to find the windows installation date with command prompt via simple method.

If you just want to know about the installation date of your Windows, then you can easily get it using Command Prompt. systeminfo is a command in Windows that gives you details about the configuration of your hardware and also about the operating system. It displays the security information, information about the RAM, network adapters, the disk spaces and the Product IDs.

Getting Windows Installation Date With Command Prompt

Click on start and type “Run” for run dialog box. This can be done by pressing Win + R on the keyboard.
>Now type “msconfig” and hit Enter.
>Now type the command given below in the Command Prompt Window.

systeminfo | find /i "Original Install Date"

To Find Windows installation date!


This will display the Windows installation date and time.

Many people suggested some other ways too, like you can check the creation date of your Windows folder, or you can check the first update in your Windows Update history. But both of these methods work until and unless you did a clean install on your system. They will show different date if you have upgraded your version of Windows.
Instead of the complete command you can use systeminfo which will fetch you much more information about your system.

NOTE This method is tested on Windows 7 and Windows 8. It should work on older versions too. If it fails, use the command “systeminfo” and scroll up to find the Windows installation date.


Monday, September 2, 2013

Secrets & Shortcuts Of Window 8

In this post we will see some serious Windows 8 Shortcuts And Secrets that will make your life easier to use Windows 8 


Window 8 in a new version that make your life so easy. It comes with more beautiful feature than other OS.
I write a little and simple article for you that you will be able to use window 8 easier than before.

Windows 8 keyboard shortcuts

Knowing at least some of the Windows 8 keyboard shortcuts will make your Windows 8 experience much more enjoyable.
Try to memorize these top Windows 8 shortcut keys.

Press the Windows key to open the Start screen or switch to the Desktop (if open).

Press the Windows key + D will open the Windows Desktop.

Press the Windows key + . to pin and unpin Windows apps on the side of the screen.

Press the Windows key + X to open the power user menu, which gives you access to many of the features most power users would want (e.g. Device Manager and Command Prompt).

Press the Windows key + C to open the Charms.

Press the Windows key + I to open the Settings, which is the same Settings found in Charms.

Press and hold the Windows key + Tab to show open apps.

Press the Windows key + Print screen to create a screen shot, which is automatically saved into your My Pictures folder.


About hot corners

The corners on your screen are hot corners and give you access to different Windows features. 
Below, is a brief explanation of each of these corners.

1:Bottom Left-hand corner

The bottom left-hand hot corner of the screen will allow you to access the Start screen, if you're in the Start screen and have the Desktop open, this corner will open the Desktop from the Start screen.

Tip: Right-clicking in the left hand corner will open the power user menu.

2:Top-left corner of the screen

Moving the mouse to the top-left corner and then down will display all the apps running on the computer. Clicking and dragging any of these apps to the left or right-hand side of the screen will snap that app to that side of the screen. Each of these open app icons can also be right-clicked to close or snap.It shows a beautiful feature of win8.

3:Right-hand side of the screen

On the full right-hand side of the screen will be given access to the Windows Charms.

Taking advantage of search

The Search in Windows 8 has been significantly improved when compared to all previous versions of Windows. To search for a file or run a program in Windows 8 from the Start screen just start typing what you're trying to find or want to run.You don't need to click on any search bar. Just open the start menu by clicking on bottom left corner or window key. Type any thing you want to search from your computer.
As you begin typing, the results will start appearing on the left-hand side. In addition to being able to search for files and run programs, the Search also supports limiting the search to apps such as Finance, People, Maps, Photos, Mail, Music, Videos, Weather, and much more. If what you are searching for is not a file or program, click on the app you wish to use as the search. For example, if you were searching for "New York" and selected the Weather App you would be shown the weather in New York, NY.
By default, Search organizes the available Apps by how frequently they are used and then in alphabetical order. If you want to keep your favorite app at the top of the Search list, right-click the app and choose Pin. Pinning the app will lock it in place regardless of how often it is used. If there is an app you don't want (e.g. Finance) you can turn on and off any of the search apps through the PC settings, which is found under the Settings in the Charms.It is more reliable feature of win8 that makes it more powerful than other OS.

Bonus tip: The Search is also found through Charms and can also be opened by pressing Windows key + F.


Customize your tiles

Make the most of your Windows Start screen tiles by adjusting the sizes, where they are located, and what is listed.
Move any tile by clicking and dragging the tile. While moving a tile, if you need a larger view of the Start screen move the tile towards the top or bottom of the screen to zoom out.
Use your mouse wheel to scroll left-to-right through your tiles.
Any Desktop shortcut or program can be pinned to the Start screen by right-clicking the icon and choosing Pin to Start.
In the bottom right-hand corner of the start screen is a magnifying glass with tiles, click this icon to get a zoomed out view of your Start screen. In this view, if you right-click on a group of tiles you'll be given the option to name group, which can be useful if you have a group of related tiles (e.g. games). In this view, you can also click and drag a group to organize your tile groups.
Create a new speed bump between tile groups by moving a tile to a speed bump.
Resize any User tile or Live tile by right-clicking the tile and choosing resize.
If there is a tile you want on your Taskbar, right-click the tile and choose Pin to taskbar.
Show admin applications on the Start screen by clicking Settings in Charms, click Settings, and change the Show administrative tools from No to Yes.
In Internet Explorer 10, you can also pin any of your favorite web pages to your Start Screen.
Done!!

I hope you become able to use your window 8 by using these simple and beautiful tricks. Dont forget to give your feed back please if you enjoy these tricks and like my hard work.
Thanks in advance :)


Friday, August 23, 2013

10 Secrets Of Window 7, Tips n Tricks You Didn't Know!!

Hi, in this article am gonna tell you about window 7 top 10 secrets that your don't know.
Window 7 become a most popular OS because of its simpleness and user friendly. although you are using this OS but there are many things or secrets which you don't know. I have tried to show some important and useful tips of window 7, hope you enjoy it.


1: Change the background of windows media player:

 Go to Run and type “Regedit”, It will open a registry editor.
 Locate this key in registry editor
HKEY_CURRENT_USER\Software\Microsoft\MediaPlayer\Preferences
 Double click on the key LibraryBackgroundImage and enter a value between 0 to 6 (each number represents a background).
Done!

2: Move open windows:

If we press windows logo key + arrow key, then we will see the hover window is moving in the different sides according to the pressed arrow key.
We can also minimize our opened hover window by pressing windows logo key + two times down arrow key.
Done!!

3:Windows 7 trick to access hidden themes: 

Windows 7 doesn’t come bundled with a huge set of themes with it, so here is a simple windows 7 trick by which we can use windows 7 themes which aren’t made for us.
Just type C:\Windows\Globalization\MCT in the search box of start button and press enter.
You will see some folders of themes which are made for other countries like USA and Canada.
Done!!

4:Install windows 7 on netbook with a pendrive or flash drive:

To install windows 7 on a net book with a pen drive, Take a 4GB pen drive and format it with FAT32 file system, Then just copy an ISO image to the pendrive by xcopy d:\ e:\ /d /e (where d: is the DVD drive which contains windows cd in it and e: is the pen drive location). It will create a bootable pen drive by which you can easily install windows 7 on netbook.

5:Zoom in and Zoom out in an easy way:

Windows 7 made accessing of magnifier lot more easier than its predecessor, to zoom in press windows key and + and to zoom out press windows key and -
Done!!


6: New windows 7 calculator: 

New windows 7 calculator looks like vista one, but if you look it closely then you will find a lot of advance modes like standard, scientific, programmer and statistics.
These modes support thousands of operations to solve a complex problem. To activate any of the mode just click on view and select mode.
Done!!

7:Experience the new windows 7 WordPad:

The all new windows 7 WordPad supports format like .docx and .odt, so now you don’t need to download Microsoft office 2007, in order to open a MS office 2007 word document.
Done!!

8:Burn Cd and Dvd’s with windows 7 built in burner:

Now you can burn with widow 7 burner easily.
Windows 7 provides its own burner to burn cd’s and Dvd’s, So we don’t need to download softwares like nero to burn ISO.
To burn an ISO file, Right click on the ISO file and select Burn Disc image, or easier just double click the ISO file.
Done!!

9:Change the order of taskbar options: 

Many windows users worry for their taskbar, so if you are one of them, Here is a great news.
You can easily arrange the taskbar options in any order by dragging and dropping.

10:Make a system repair disc: 

Almost all versions of windows supports this handy feature, making system repair disc is helpful in situations when we are facing problems booting windows.
System repair disc restore the windows to an old state without affecting your hard disk data. To create a system repair disc go to start, then maintenance and then create a system repair disc.
Done!!! :)